sli.dev for non-web developers
I always struggled every time I had to do a new presentation. Don’t get me wrong, Google Slides is good, and suffices for most common use cases. The problem is when the slides keeps changing, and you want to do some versioning on them. I made some slides in the past using LaTeX with the Beamer class. A friend even showed me a nicer template than the default ones. The problem is, though this solution is portable (you can generate a PDF file), it lacks some features that I wanted, like animations, transitions, and support for drawing.
I took a look at Reveal.js, but it was too much work to setup and maintain. I also went for Remark, but the last update was more than 2 years ago. That’s when I found sli.dev. It’s a framework under constant development for creating slides using Markdown. It’s based on a lot of web technologies, but you don’t need to be fluent on them to use it. Here is everything that you’ll need to get started.
Installing node version manager (nvm)
nvm allows you to quickly install and use different versions of node via the command line. To install the latest version, run the following command:
get_latest_github_raw_no_v() {
  # use it for when the link for the download doesn't have a version included in the name of the file
  # e.g.: https://raw.githubusercontent.com/nvm-sh/nvm/v0.39.3/install.sh
  # usage: get_latest_github_raw_no_v "user/repo" "filename"
  version=$(curl --silent "https://api.github.com/repos/$1/releases/latest" |  # Get latest release from GitHub api
    grep '"tag_name":' |                                             # Get tag line
    sed -E 's/.*"([^"]+)".*/\1/')                                    # Pluck JSON value
  echo "https://raw.githubusercontent.com/$1/$version/"$2
}

# Install node version manager (nvm)
site=$(get_latest_github_raw_no_v "nvm-sh/nvm" "install.sh")
curl -o- $site | bash
Then, add the following lines to your ~/.bashrc file:
# enable node version manager
if [ -d "$HOME/.nvm" ]; then
    export NVM_DIR="$HOME/.nvm"
    [ -s "$NVM_DIR/nvm.sh" ] && \. "$NVM_DIR/nvm.sh"  # This loads nvm
    [ -s "$NVM_DIR/bash_completion" ] && \. "$NVM_DIR/bash_completion"  # This loads nvm bash_completion
fi
Restart your terminal, or just reload the ~/.bashrc file:
. ~/.bashrc
Installing Node (latest version)
To install the latest node version, run the following command:
nvm install $(nvm ls-remote | grep -i latest | tail -n 1 |
  sed -ne 's/[^v0-9]*\(\([0-9]*\.\)\{0,4\}[0-9][^.]\).*/\1/p' | xargs)
In my case, the latest version available is v20.2.0. You can check the installed version by running:
node --version
Installing sli.dev
To install sli.dev, simply run:
npm init slidev
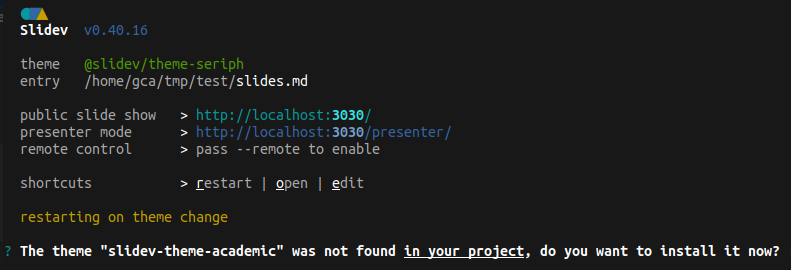
This command will install everything you need, ask for the project name, and start the template project. After the installation, you should see the following lines in your terminal:
public slide show   > http://localhost:3030/
  presenter mode      > http://localhost:3030/presenter/
  remote control      > pass --remote to enable

  shortcuts           > restart | open | edit
If the browser did not open automatically, you can open it manually by accessing the URL http://localhost:3030/. To stop running the server, just press Ctrl+C in the terminal. After stopped, you can start the development server again by entering the created directory and running:
npm run-script dev
To see a list of scripts, run npm run:
Scripts available in XXXXXXXXX via `npm run-script`:
  build
    slidev build
  dev
    slidev --open
  export
    slidev export
If you want to modify any of these commands (or create more, like exporting presenter notes), you can edit the package.json file. For example, to add a command to export presenter notes, add the following lines to the scripts section:
"export_notes": "slidev export-notes"
Changing sli.dev template
You can change the presentation theme simply by editing the theme attribute on the front matter of slides.md file. When you change and save it, the cli interface will automatically download and apply the new theme.
theme: academic

Basic settings
I am not a hardcore sli.dev user or web developer. So there were some things that took some time for me to figure out, and I think it is worth mentioning. The first one is forcing the slides to be in dark mode. To do that, add the following line to the front matter of slides.md:
colorSchema: "dark"
While using the academic theme, by default every slide with a # title will be added to the table of contents. To hide a slide from the table of contents, add the following line to the front matter of the slide:
hideInToc: true
For the sake of organization, I like to create a different file for each section in my presentation, then import these files in my main slides.md. To do that, create a new file with the markdown extension, then add the following lines to slides.md for each file to be included:
---
src: slides/other_slide.md
---
Exporting slides
Exporting to PDF or PNG relies on Playwright for rendering. You will therefore need to install playwright-chromium to use this feature. For this, run:
npm i -D playwright-chromium
Then, add the following lines to the scripts section of the package.json file:
"export_slides": "slidev export --with-toc --with-clicks"
To export the slides, run:
npm run-script export_slides
Updating dependencies
To update node to the latest LTS release, run:
nvm install $(nvm ls-remote | grep -i latest | tail -n 1 |
  sed -ne 's/[^v0-9]*\(\([0-9]*\.\)\{0,4\}[0-9][^.]\).*/\1/p' | xargs) --reinstall-packages-from=current
To check for dependencies that need to be updated, run:
npm outdated
which will output something like this:
Package      Current   Wanted  Latest  Location                  Depended by
@slidev/cli  0.43.11  0.43.15  0.46.1  node_modules/@slidev/cli  xxxxxxxx
To updated installed dependencies, simply run:
npm update
Keep in mind that npm update will never update to a major breaking-changes version, only to a minor one. What this means is, it will use the Wanted version in the table above instead of the Latest version. To obtain the Latest version, call the install command with @latest appended to the package name. For example, to update @slidev/cli to the latest version, run:
npm install @slidev/cli@latest
Enjoy Reading This Article?
Here are some more articles you might like to read next: